TT284 Insight - JavaScript
This material is largely taken from part Part 2 of Block2 starting at the point when the JavaScript language is introduced.
8 JavaScript
As I mentioned before there are a number of client-side technologies that can be used for web development. Here we are going to investigate a quite common example in more detail, ‘JavaScript’. JavaScript is a programming language and often called a scripting language. You might also hear JavaScript described as an ‘interpreted’ language. I view JavaScript as a programming language and also a scripting language just because it is interpreted. JavaScript is just one client-side scripting language, and you may be wondering why I am dedicating special attention to it. You will perhaps only appreciate the advantages of JavaScript at the end of this block, but you may like to consider the following points now:- JavaScript can be embedded in any XHTML page
- JavaScript can be natively interpreted by most modern browsers, without the use of plug-ins
- Computations and actions are executed on the client side, and there are situations in which this is preferred, for example to add responsiveness to a web page
- JavaScript is ‘mainstream’, meaning that it is recognised as a useful language, a standard and as having some longevity.
8.1 Inserting JavaScript into web pages
There are three common ways of inserting JavaScript code in a web page:-
Inside an HTML tag script, in a ‘character data’ or CDATA section:
<script type="text/javascript">
The CDATA tags are also commented out using JavaScript comments ‘/* comment */’ so that older browsers that do not recognise the CDATA tag will see this as a comment. Inside of the CDATA markers the text is ignored by current browsers. This means that it can contain characters such as "<" or "&" that would otherwise cause errors. As JavaScript often contains such characters then using ‘CDATA’ is a good way to include code in a web page.
/* <![CDATA[ */ alert("JavaScript is working in your browser"); /* ]]> */ </script> -
Inside an external .js file, linked to the HTML page that contains a declaration:
<script type="text/javascript" src="path/to/file.js"> </script>
The external .js file will include just the JavaScript code. No HTML is allowed in the external file.
-
As a value of some HTML attribute in the HTML:
<a href="javascript:alert('JavaScript is working in your browser');">link</a>
JavaScript code in a page is parsed as the page is loaded just as HTML is parsed. The code may be executed at the time it is loaded into a browser, or it may be executed following some subsequent event such as the user clicking a button.
Activity 2 JavaScript ‘Hello world’
You are now ready to try your first ‘Hello world’ script, which is the typical first program that you learn to do when you study a new programming language. A Hello world program just prints ‘Hello world’, and nothing else. Include the following instructions (a JavaScript script) in the body of the otherwise empty HTML web page:<script type="text/javascript"> <!-- document.write("Hello world"); //--> </script>
If you open the HTML page complete with code in a browser then you will see the ‘Hello world’ text written into the page (Figure 6).
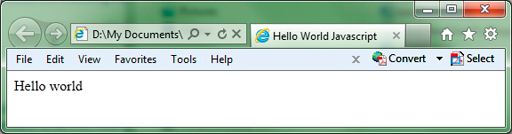
Figure 6 JavaScript writing to an HTML document
JavaScript uses ‘document.write’ to print information in the web page. You will encounter this many times over the coming weeks. After trying the Hello world script, try to modify it in the following ways:- Alert is used in the first example of how scripts can be included in HTML given earlier. Now modify the script above to provide an ‘alert’ message using ‘alert’ instead of ‘document.write’.
- An external script file is used in the second example of how scripts can be included in HTML given earlier. Now try moving the script out to an external JavaScript (i.e. called ‘helloworld.js’) file, as explained earlier. The external file should only contain the script and no HTML tags. So, it should only contain the ‘document.write’ statement.
More realistic use of JavaScript in HTML
Now, diving right in, let’s have a look at a more realistic ‘behaviour’ for a form that can be implemented using JavaScript, and then look at the JavaScript code required to implement the behaviour. Don’t be overly concerned if you don’t understand all the details of the code at this stage. This example is just an illustration of what JavaScript can do; the 'how' (it works) is not so important at this stage. I’ll be using an example of an imaginary flooring supplies company ‘Flooring 4-u R-us’, which has a website for potential customers.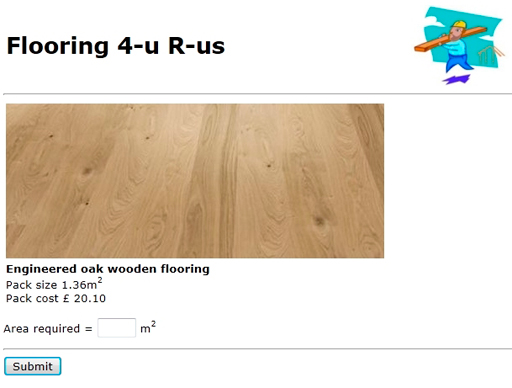
Figure 7 Web page for costing wooden flooring
The form in Figure 7 is intended to be used by a potential customer (‘the user’) to state the area in square metres of flooring they require. This web page is for a specific type of ‘Engineered oak wooden flooring’ that is supplied in packs, each of which covers 1.36 m2 of floor area. The page would probably be part of the supplier’s catalogue of different floorings. This form is intended to give the user a cost for an amount of oak flooring they want to order.
On this web page the user types a number, let’s say ‘5’; clicks ‘Submit’, and then waits for the server to respond. The response might look like that shown in Figure 8. You can see that the application has calculated the number of packs of flooring required and has added VAT and a delivery charge to arrive at a total cost.
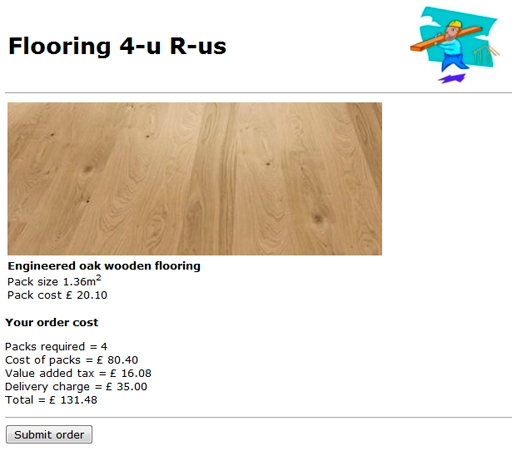
Figure 8 Response to request for costing
This information will be useful to the customer, but if the server performs the calculation, then every time the customer wants to see the cost of any type of flooring, then a request has to be sent to the server and the customer has to wait for the result to be sent back and displayed. Perhaps even worse is that if the customer changes the area required, then a new request has to be sent to the server to recalculate a new cost.The web page in Figure 7 illustrates a basic need for a simple local ‘behaviour’. You might reasonably expect that the information displayed in the web page in Figure 7 is put together by the web server, which gets the image of the particular flooring, the pack size and pack cost and puts these together with a standard heading, etc. I will investigate exactly how a server might do that later in this block, but for now the key point is that all the information required to calculate the price can be made available as part of the initial web page. If this is the case, then when the user types in the area of flooring required, the price can be calculated by the browser on the client side without sending any request back to the server. That is exactly the type of ‘behaviour’ JavaScript supports within a browser.
I will continue with some of the basics of JavaScript shortly, looking at how to add it to web pages, and investigating some of the more useful constructs for handling forms. Further information is provided by an optional guide ‘An introduction to JavaScript' which you might want to refer to if you need basic information on a specific programming construct or feature as you progress through this part of the block and the next.
It is expected that you already have a good understanding of the use of variables, arithmetic expressions, Boolean simple and compound expressions, assignment statements, loops and selection structures, and simple mathematical functions from your previous studies. You will also require some understanding of ‘arrays’. If you studied TU100, you will have encountered ‘Lists’; ‘arrays’ are used for a similar purpose. As you work through the coding examples and activities in this part of the block if you find that you are unfamiliar with any of these aspects then you should refer to the JavaScript guide and/or seek advice in the forums. If at any time you want a more comprehensive reference text covering JavaScript in more detail, then you should find information in one of the references, available through the OU library, listed at the end of this guide.
Now I will take a detour away from JavaScript for a while to examine an important model which involves adopting a tree structured view of HTML pages; the Document Object Model (DOM).
8.2 The Document Object Model (DOM)
The Document Object Model (DOM) is a technique based on a view of a web page as a hierarchical structure made up of objects. The DOM itself is not part of JavaScript, but has been defined by the W3C (n.d.). As with other W3C specifications, the DOM has been documented in a number of different documents. I will suggest some good sources of information shortly. The DOM provides the functionality needed to manipulate hierarchical elements and attributes in an HTML page. To be able to use client-side JavaScript effectively, you need to understand the DOM and to know the basic objects, methods, properties and events.The DOM is based on a representation of a document in a structure similar to that of a family tree. The HTML fragment:
<!DOCTYPE html PUBLIC "-//W3C//DTD XHTML 1.0 Transitional//EN"
http://www.w3.org/TR/xhtml1/DTD/xhtml1-transitional.dtd">
<html xmlns="http://www.w3.org/1999/xhtml">
<head>
<meta http-equiv="Content-Type" content="text/html; charset=iso-859-1" />
<title>My DOM example</title>
</head>
<body>
<h1>A heading</h1>
<p>Some <b>text in a</b> paragraph.</p>
</body>
</html>
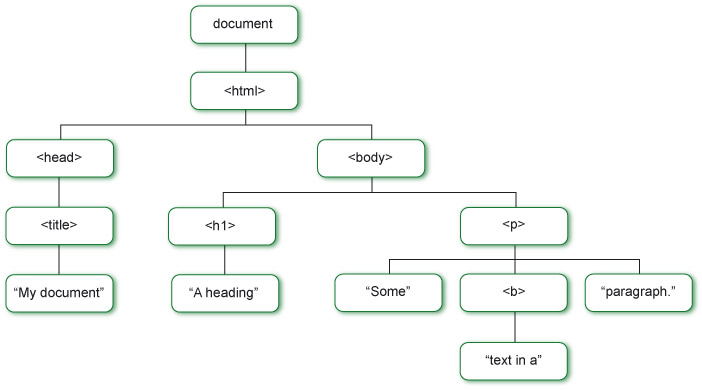
Figure 9 Tree representation of simple HTML document
The tree representation is made up of nodes. The top level node, the document, is the root node and the parent node of the html node. The html node is the child node of the document node and is itself the parent node of both head and body nodes. The head node is the first child node of the html node and a sibling node of the body node.The DOM view of HTML is useful because it provides a tree structure which can be navigated or altered. It provides the means to access any element of the HTML, not just the tags and text in the HTML but also any values, for example, which have been typed into form fields. The animation (Figure 10) examines the DOM structure of an HTML form and looks at how a form field value can be accessed. You will need to set aside ten to fifteen minutes to work through the animation. You may want to make notes as you view it, which will prove useful should you view it again. Please note, the spoken introduction before the animation begins is around 1 minute and 15 seconds long . Click on the play arrow to watch it.
Figure 10 The Document Object Model (DOM) and access to HTML form elements
In Figure 9 the top level node represents the entire document being shown in the web browser. Above the level of document are a few other objects that allow JavaScript to access information that is not specific to the individual web page being displayed. The upper levels of the DOM consist of a few fixed objects that are always accessible to JavaScript (Figure 11), such as the browser history and the document. To make a reference to an object, a ‘dot’ notation is used, so, for example, the images in a page would be referred to as ‘window.document.images’. As the top level ‘window’ object is usually taken as implied, this is normally abbreviated to just ‘document.images’.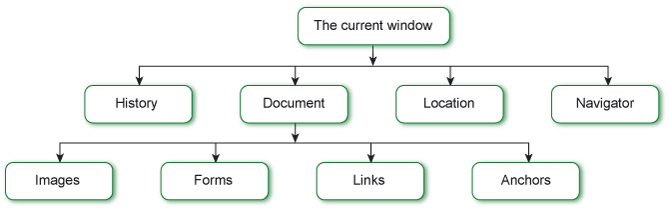
Figure 11 Example objects below ‘window’
The window object
At the top level of the DOM hierarchy is a single window object, which represents the browser window. All the other objects in the DOM are contained directly or indirectly by the window object. The window object has some methods too. You have been using one of them, i.e. ‘Alert’.Activity 3 What’s in a window?
You can inspect the window object with the following script that can be found in the Block 2 resources folder:
<script type="text/javascript">
/* <![CDATA[ */
var list_of_properties = "The windows object: ";
for (property in window)
{
list_of_properties += property + ", ";
}
list_of_properties = list_of_properties.slice(0,-2);
alert(list_of_properties);
/* ]]> */
</script>
You should now try the script by inserting it into an HTML page and loading this into your browser.
Discussion
The window object has a lot of properties and these can be altered by appropriate scripting. Remember that the DOM has slightly different implementations across browsers. The alert produced by Internet Explorer 8 is as shown in Figure 12. It is not important to know the details of all the items listed by the script as most will not be employed in this module but it is useful that you know there is a lot more to the elements that make up the DOM. These include, for example, the window location on the screen and its size which can be altered by Javascript. If you produced an application that opens a new browser window you can thus set its size and position to be appropriate for the information that needs to be displayed.
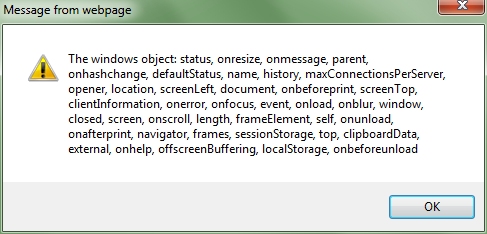
Figure 12 Alert message listing windows object properties, methods and events.
The document object
The document object is a child of the window object, and allows us to manipulate a web page. For example, you can use the document object to insert content in a web page:document.write("<p>This text is going to be inserted in the web page</p>");
There are different ways to write content into a web page using JavaScript. You have already tried document.write, which is very simple to use, but is not available for XHTML 1.1 documents (it is only available for HTML and XHTML 1.0 documents). Nevertheless, XHTML 1.1 is not yet supported well enough by browsers, and you can safely use XHTML 1.0 and document.write. It is therefore particularly important when coding your XHTML documents with JavaScript to choose an XHTML 1.0 document-type definition.The navigator object
The navigator object (window.navigator) allows us to retrieve information about the browser that has been used to access a page. Through the navigator object, you then can then identify the name of the browser (navigator.appname) and the operating system of the client (navigator.platform).The images object
The document object includes an images object (document.images), which allows access to all the images that are included in the document.
Activity 4 What’s in a window (again)?
Write a simple web page that re-uses the code from Activity 3, but which lists the properties of the navigator and images objects in the web page itself, as in Activity 2, rather than using an alert.8.3 Adding a behaviour to a form
You have seen how an HTML document can be seen as a hierarchical structure when applying the Document Object Model (DOM) and seen something of how an element inside of a form which has been given a unique ID attribute can be retrieved. Before I go on to look further at JavaScript to access any element in a web page based on the DOM in a simple fashion, I will revisit the form you saw in Figure 8; the example of JavaScript embedded in a form which calculated the cost of an order of flooring from 'Flooring 4-u R-us'. The JavaScript required to calculate the number of flooring packs and the cost is listed below. I have added line numbering on the left so that code can easily be referenced.
1 <!DOCTYPE html PUBLIC "-//W3C//DTD XHTML 1.0 Transitional//EN"
2 "http://www.w3.org/TR/xhtml1/DTD/xhtml1-transitional.dtd">
3 <html xmlns="http://www.w3.org/1999/xhtml" xml:lang="en" lang="en">
4 <head>
5 <meta http-equiv="Content-type" content="text/html; charset=iso-8859-1"/>
6 <link rel="StyleSheet" href="styles.css" type="text/css" media="screen" />
7 <title>Flooring 4-u R-us Oak Hardwood</title>
8 </head>
9
10 <body>
11
12 <script type="text/javascript">
13 /* <![CDATA[ */
14 function calculateOrder() {
15 delivery = 35
16 packCost = 20.1
17 vatRate = 0.2
18 packArea = 1.36
19
20 area = Number(document.floorOrderForm.msquared.value)
21 packs = Math.ceil(area / packArea)
22 document.floorOrderForm.packs.value = packs
23 cost = packs * packCost
24 vat = cost * vatRate
25 total = cost + vat + delivery
26 document.floorOrderForm.cost.value = cost.toFixed(2)
27 document.floorOrderForm.vat.value = vat.toFixed(2)
28 document.floorOrderForm.delivery.value = delivery
29 document.floorOrderForm.total.value = total.toFixed(2)
30 }
31 /* ]]> */
32 </script>
33
34 <hr/>
35 <table width="100%">
36 <tr>
37 <td><h1>Flooring 4-u R-us</h1></td>
38 <td><img src="carpenter.jpg" alt="Carpenter carrying flooring"/></td>
39 </tr>
40 </table>
41 <hr/>
42
43 <table>
44 <tr>
45 <td><img src="oakEngineeredFlooring.jpg" alt="oak floor"/></td>
46 </tr> 47 <tr>
48 <td><b>Engineered oak wooden flooring</b>
49 <br/>Pack size 1.36m<sup>2</sup>
50 <br/>Pack cost £ 20.10</td>
51 </tr>
52 </table>
53 <p/>
54
55 <form action="http://students.open.ac.uk/mct/tt284/reflect/reflect.php"
method="post" name="floorOrderForm">
56
57 Type in your flooring area in m<sup>2</sup>
58 required: <input type="text" name="msquared" size="3" maxlength="4" /><p/>
59 <input type="button" name="test" value="Calculate order" onclick="calculateOrder()"/>
60
61 <p/>Your order description is:<p/>
62 <table>
63 <tr><td>Packs required = </td> <td><input type="text" name="packs" size="6"
maxlength="6"/><br/></td></tr>
64 <tr><td>Cost of packs = </td> <td><input type="text" name="cost" size="6"
maxlength="6"/><br/></td></tr>
65 </td></tr>
66 <tr><td>Value added tax = </td> <td><input type="text" name="vat" size="6"
maxlength="6"/><br/></td></tr>
67 <tr><td>Delivery charge = </td> <td><input type="text" name="delivery" size="6"
maxlength="6"/><br/></td></tr>
68 <tr><td>Total = </td> <td><input type="text" name="total" size="6"
maxlength="6"/><br/></td></tr>
69 </table>
70 <input type="submit" name="submit" value="Submit order"/>
71 </form>
72
73 </body>
74 </html>
All the code in this script is written as a single function called ‘calculateOrder’. This starts out (lines 15-18) by defining some constant values for delivery charge, the cost of a pack of this flooring, the rate of UK value-added tax (VAT) as a rational number, and the area in square metres that a single pack of this flooring covers. These values could be included in the web page served by the server that might retrieve the values from a database.
In line 20 the area that the user has typed into the form is retrieved from the form and converted to a number. This is done by using a reference into the form to a field and getting the field value:
document.floorOrderForm.msquared.value
This reference is based on the ‘Document Object Model’ (DOM) of the web page. When the page is loaded in a browser, it is parsed and a set of objects are created that correspond to the different items found in the page (forms, headings, etc.).This reference to the DOM of the form is made up of four elements. The first ‘document’ is a reference to the web page content as a whole. The next element is a reference to the ‘form’ item on the web page (see line 55). The last two elements make up a reference to the value of the metres squared ‘msquared’ field in the form (line 58). This way of referring to a form field and its value can be thought of as a path through the named parts of the form. The first reference 'document' is a default name of the entire web page. Then I have used two references to named elements; 'floorOrderForm' is the name of the form on line 55 and 'msquared' the name of the input element on line 58, which is with the form. The last part of the path is a reference to the value within the input field.
So the statement:
area = document.floorOrderForm.msquared.value
fetches the value in the metres squared field and gives that value to the ‘area’ variable. In the code of the function (line 20), I have used a JavaScript function ‘Number’ to convert what is found in the value field into a number. This function (see ‘JavaScript Number Object’) actually creates a ‘number object’ based on the numeric value passed to it as an argument. If the value cannot be used to generate a number then the value ‘Not-a-Number’ (‘NaN’) is returned. So for safety I really should be testing for this. Having got the area of flooring required out of the form, then the number of packs of flooring is calculated on line 21:packs = Math.ceil(area / packArea)
which divides the floor area by the area covered by one pack and then uses the JavaScript ‘Math.ceil’ method, which rounds the number upward. The result is then put into the ‘packs’ form field on the next line. On lines 23-25 the flooring cost, VAT and grand total are calculated. These totals, together with the fixed delivery charge, are then put into the corresponding form fields on lines 26-29. When this is done the JavaScript method ‘toFixed()’ is called to restrict the number of decimal places to two.So, overall, the calculateOrder() function, when called, will get the flooring area required from the form, calculate all the costs based on this area and will then put the results ('cost;, 'vat', 'delivery' and the final 'total' cost) back into the appropriate fields in the form. The function is parsed and checked for syntactic correctness when it is loaded into the browser, but it is not executed until the function is invoked by some other subsequent action that I have yet to describe.
So, all that is needed now is a means to call the function. There are different ways this can be done but on line 59 the approach taken here is shown. I have added a button labelled ‘Calculate order’ to the web page. When this button is clicked the ‘calculateOrder’ function is called. The ‘onClick’ feature of a button is an event that is called when the user clicks on the button. This allows code to be called whenever the button is clicked, rather than when the web page is loaded. I will examine events in a little more detail shortly.
Activity 5 Show an alert on button clicked event
To demonstrate how the onClick event works and how JavaScript can be used to interact with the user we can try out an approach using an ‘alert’.
<!DOCTYPE html PUBLIC "-//W3C//DTD XHTML 1.0 Transitional//EN"
"http://www.w3.org/TR/xhtml1/DTD/xhtml1-transitional.dtd">
<html xmlns="http://www.w3.org/1999/xhtml" xml:lang="en" lang="en">
<head>
<meta http-equiv="Content-type" content="text/html; charset=iso-8859-1"/>
<link rel="StyleSheet" href="styles.css" type="text/css" media="screen" />
<title>Flooring4URUS Oak Hardwood</title>
<script type="text/javascript">
function show_alert()
{
alert("Hello! I am an alert box!");
}
</script>
</head>
<body>
<input type="button" onclick="show_alert()" value="Show alert box" />
</body>
</html>
Download the web page for this activity from the Block 2 Part 2 Resources folder, if you haven't already done so, and try it out by opening it in a browser and clicking on the button.
Activity 6 Flooring cost calculation in JavaScript
Download the form from the Block 2 Part 2 Resources folder and save it to your machine. Try the form out and make sure that you understand how it works.As I mentioned the value of ‘area’ should be checked after it is converted to a number to make sure it is a number. Alter the form so that the value returned by the ‘Number’ function is checked to ensure it is a number. If the value is NaN then an Alert can be used to warn the user the value has to be a number and, of course, the calculations can’t be made if it is not a number.
Hint: here is an outline of the appropriate code:
area = Number(document.floorOrderForm.msquared.value)
if (isNaN(area))
{
Some code to alert the user that they must enter a number.
}
else
{
Code to do calculations and fill fields as before.
}