Scratch Survey Activities
Welcome !
Thank you for volunteering to help us with this research.
There are four steps which you are asked to undertake to complete the survey:
-
obtaining and run a graphical programming tool called 'Scratch'.
We also provide a
brief introduction to the Scratch interface.
-
perform a few simple programming activities using Scratch by following our brief guide
-
compare the graphical programs that you have seen in '2' with some
textual equivalents
which are similar to those found in more mainstream programming languages
-
complete a short
online survey concerning your experiences of using Scratch
Obtaining Scratch
Scratch is available from the
MIT site but you can more easily download it using the links
on this page:
Check that Scratch is working by starting the application up which should appear as in Figure 1 below.
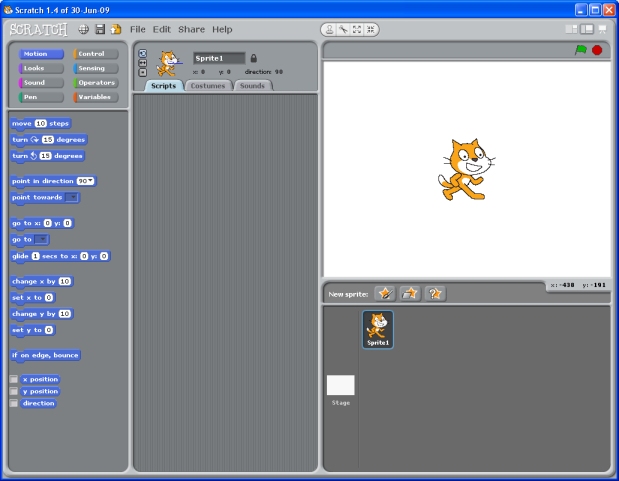
Figure 1 Scratch window when first started.
If you have any questions or problems getting Scratch to run please contact us directly and
provide whatever information you can
n.k.simpkins@open.ac.uk
Introducing Scratch
Scratch offers a wide range of facilities and can be used to develop
interesting and complex programs. Here we are only concerned with using a few very
basic aspects of Scratch to get started on a road to learning to
program.
Scratch can be used to write and run programs which are written using its own
graphical programming language. There's some similarity with other applications
you have met, such as MS Word, in that you can write a program, just as you might
a write document in Word, save it in a file or open a program stored in a file on disc.
The Scratch interface has a set of 4 different panels, as numbered in Figure 2.
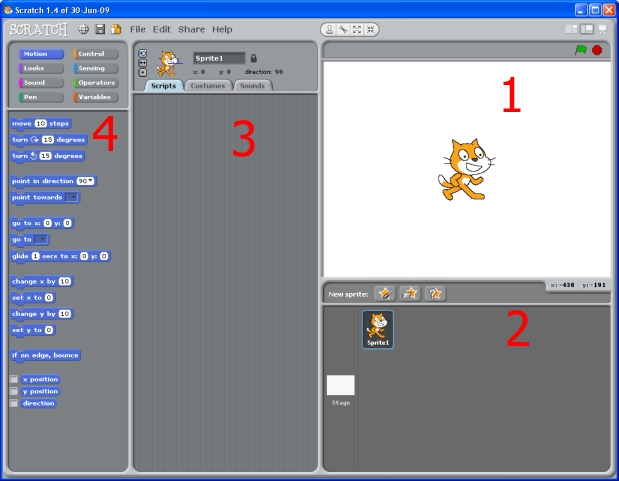
Figure 2 Scratch window with numbered panels.
You will see how these areas are used shortly, but in brief they can be described:
-
is called the 'stage', it's where a program can display graphics and animations.
In Figure 2 you can see the Scratch logo (a cat) is displayed. A character like
this is called a 'Sprite'.
A sprite is a self-contained program that can have a graphic associated
with it that can be made to appear and move on the Stage
-
just below the stage is a grey area we will call the 'icon list'
where the icons representing the different sub-parts of a programming project are displayed.
In Figure 2 you can see he stage and single sprite are displayed.
-
the middle pane (called the 'Scripting pane') is where all program code is constructed
and stored. Selecting an item in the icon list determines which item the middle pane
applies to and so also which we are programming.
-
the left-most area is called 'the palette'. This provides access to different types
of building blocks that are used to construct programs. The 8 buttons at the top
of the panel allow you to select different types of block. When you open Scratch the
'Motion' button is selected by default, but here we are mostly concerned with
blocks which are in the 'Control' group.
Unlike conventional programming languages, Sense doesn't require you to do much typing
when creating a program. Instead you build programs from graphical blocks which are
arranged into eight palettes. The palettes
are accessed through the eight palette buttons located at the top left of the Scratch
window just below the logo.
Each palette contains a certain selection of Scratch commands (blocks), so all of the
commands to move objects on the screen are in the Motion palette, all those that control
sound are in the Sound palette and so on. If you
click on a palette you will see that the palette button changes colour and a matching
coloured palette of blocks appears directly below the palette buttons.
To demonstrate the general approach to constructing a program we can employ a demonstration
program which you can
download now
(right click the link and select 'Save target as..') to your machine.
Open the download from inside Scratch by selecting the 'File' menu and then the 'Open...'
option. Browse to where you saved the download and select and click 'Ok'.
The demonstration program is shown in the scripting pane as shown in Figure 3.
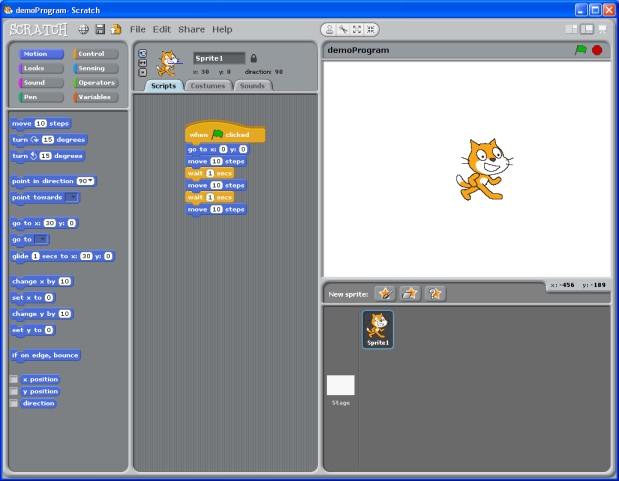
Figure 3 Scratch window after opening simple demonstration program.
The program is made up of seven blocks which together are called a 'Stack'. Don't be too
concerned with the details at this stage - after you have run the program you will
hopefully find what the Stack does is clear.
The first (largest) block has 'When clicked' written on it and a green flag. This is a special
type of Control block which signifies the start of a program. Clicking on this block will
start to run the program.
The next blue 'Motion' block reads 'go to x: 0 y:0'. This moves the sprite to a location
(vertically and horizontally) on the stage. The position where x (the horizontal) and
y (the vertical) equal zero is the centre of the stage.
The next blue (Motion type) block reads 'move 10 steps'. This moves the sprite forward a
few 'steps'. A step is not some animation - it's just a very small measure of distance,
so 10 steps is not very far, as you will soon see.
The next 'Control' type block reads 'wait 1 secs' which simply means pause in the progress
through the stack for 1 second before continuing.
The remaining three blocks simply repeat the 'move 10 steps', 'wait a second'
sequence. So the entire stack can be summarised as 'Start, then goto stage centre,
then move forward a little, wait a second, move foward a little again, wait again
and then finally move forward a little.
Now run the stack by clicking on the 'when clicked' block and watch the sprite
move on the stage. You can repeat this as many times as you like; each time the
sprite is sent back to stage centre before moving to the right three times.
But how was the program produced? To understand this you can extend the program
in a simple way.
Click the 'Control' button and then drag the Block 'wait 1 secs' from the pallet
to just below the bottom block in the program and then drop it so that it
joins onto the bottom ot the program. The program will then look as it does in
Figure 4.
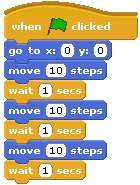
Figure 4 Demonstration program extended with a 'wait'.
The default period of time to wait is 1 second. If you click in the small
area of the wait block where '1' is displayed you can type another number
to set your own period to wait. You might do that if you wish - type '3'
for example.
Next click the 'Motion' button and drag a 'move steps' block to the bottom
of the program so that it joins on below the 'wait' block. Then change the
number '10' in this block to be say 50 so that the final program looks as in
Figure 5.
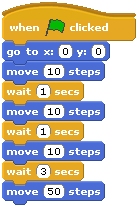
Figure 5 Demonstration program extended by two blocks.
You can save your work by selecting 'Save' from the 'File' menu. Then run the
program again and observe how the sprite moves.
You have now extended the demonstration program's stack with two additional blocks.
If you wanted you could add further blocks. You don't need to do other operations
on stacks but you might like to know that:
- You can add blocks to any position within a stack by dropping a new block at
the appropriate point in the stack.
- You can break a stack into parts, for example to access a single block in the
middle of a stack, by clicking on a block and pulling the bottom of the stack
down and away from the upper part of the stack
- You can delete a block by dragging it back to the palette area or a set of
connected blocks can be deleted in the same way
Also if you wanted to add a block
somewhere in the middle of the existing program you need to
That concludes our quick introduction to Scratch programming. Obviously we
have covered only a small amount ot facilities but this is sufficient for the
requirements here.
Next we will outline the programming activities that we would like you to
undertake. For each
Programming activities
There are four basic concepts or elements of programming, which you will find in just about any
programming language, which we wish you to consider.
- 'Sequence'. By this we mean that a program consists of a set of steps or instructions
which are carried out in the order they are written, one after another.
-
'Variables' which are used to store values such as numbers, text etc which are used in a program.
-
'Conditional statements'. This type of construct allows a choice
between different sets of subsequent instructions to be made.
-
'Iteration' or 'looping'. This type of construct allows a set of actions to be performed
multiple times simply by repeating them as many times as are desired.
For each of these we have created a simple activity or two to demonstrate the concept using
the graphical programming language of Scratch. You will not yourself have to do any programming
as the demonstration programs are provided in a form you can download and open in Scratch.
Please now follow the links in turn for each of the elements below. After completing each activity
you can return here using the 'back' link or your browser buttons.
Textual constructs
Now we would like you to consider a couple of 'textual' programming constructs based on your
experience working with Scratch.
A conditional
A conditional statement in a typical text based programming language will have
the form:
    if ( <condition> )
    then { <statements> }
    else { <statements> };
In moving to a textual programming language the Scratch blocks we used to gather
data (ie the 'ask' block) and to display information (such as the 'think' block)
via the Sprite would have to be replaced with some equivalents. Here we are
going to use:
-
read( answer ) in place of an 'ask' block, which puts a value into 'answer'
-
write( <something> ) in place of a 'think' block which displays either some
text or the value in a variable.
-
instead of a 'join' operation on strings, we simple use '+' to join
two string together (for example "Hello " + "there" produces a string "Hello there")
-
a semi-colon ';' which marks the end of a statement.
This is just a syntactic convention of the type
of textual language we are thinking of.
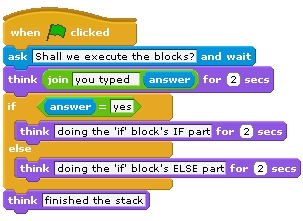
Figure 6 Scratch 'if ... else ...' block in a Stack.
So, for example the earlier 'if ... else ...' block in the stack (Figure 6)
would use a 'read' statement to get the value of answer (as if from a Scratch 'ask' Block) and
then be followed by the 'if' statement itself:
    read( answer );
    write( " you typed " + answer );
    if ( answer = "yes" )
    {
	write( "doing the if statement's IF part" );
    }
    else
    {
	write( " doing the if statement's ELSE part" );
    };
Before moving on please examine the Scratch program in Figure 6 and compare this
to the textual program above. Whilst doing so, remember how you saw the
program executing step by step (with 'stepping' switched on) in Scratch.
A loop
Earlier you employed a loop shown in Figure 7. We can use 'read' and 'write'
as textual equivalents to 'ask' and 'think' blocks but we also need some
equivalent to 'set'. To set a variable called 'number' to the value '10'
we will use a textual statement:
number := 10;
The 'wait' blocks in the stack we will simply ignore, although textual languages do have
equivalent statements.
The 'repeat <answer>' block is replaced by a 'repeat <answer> times' textual
statement.
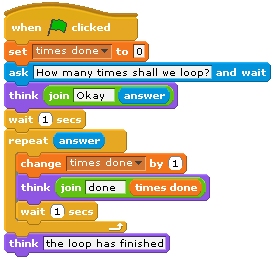
Figure 7 Scratch 'if ... else ...' block in a Stack.
So, the textual version of the Stack in Figure 7 might be:
    times_done := 0;
    read( answer );
    write( "Okay " + answer );
    repeat answer times
    {
	times_done := times_done + 1;
	write( "done " + times_done );
    }
    write( "the loop has finished");
Again, before you proceed, please examine the Scratch program in Figure 7 and compare this
to the textual program above. Whilst doing so, remember how you saw the
program executing step by step (with 'stepping' switched on) in Scratch.
Online Survey
We now what you to complete a short
online survey concerning your experiences of using Scratch.