Variables activities
All computer programs need to deal with data. In Scratch, data comes in the form of
either strings (sequences of characters) or numbers. For example, data could be simple
numbers such as temperature readings, or strings of characters such as the names of bank
account holders. If a program running on a computer is going to be able to make use of
this data, the data needs to be stored in the computer's memory and in order to access
the stored data, the program needs some way of keeping track of where the data is stored.
To help it to do this a program can make use of variables. A variable is simply a named
'chunk' or block of the computer's memory where data is stored. By using the name
of the variable in program code we are able to access the data stored in the
corresponding block of memory and also to change what is stored there. It is because
the value that is stored in a memory location can change that we use the word variable
for these named memory locations.
We can build a small program in Scratch to demonstrate the basic use of variables.
Using Scratch write a very small program which uses variables by following the
steps given below (you can also
download
the program pre-written to open in Scratch).
The program simply performs a basic addition - adding 10 to 90 to give 100.
This may not be very interesting but demonstrates how values can be held and
manipulated in a program.
-
click the 'Control' button so that you can drag a 'when clicked' block onto the
scripting pane.
-
click the 'Variables' button and then click the 'Make a variable' button. You will then see
a diloague box where you can give the variable a name. Call it say 'First number'. Then
create a another variable called say 'Second number' and finally a third called 'Result'.
At this point you should have three variables defined as shown in Figure 1 below.
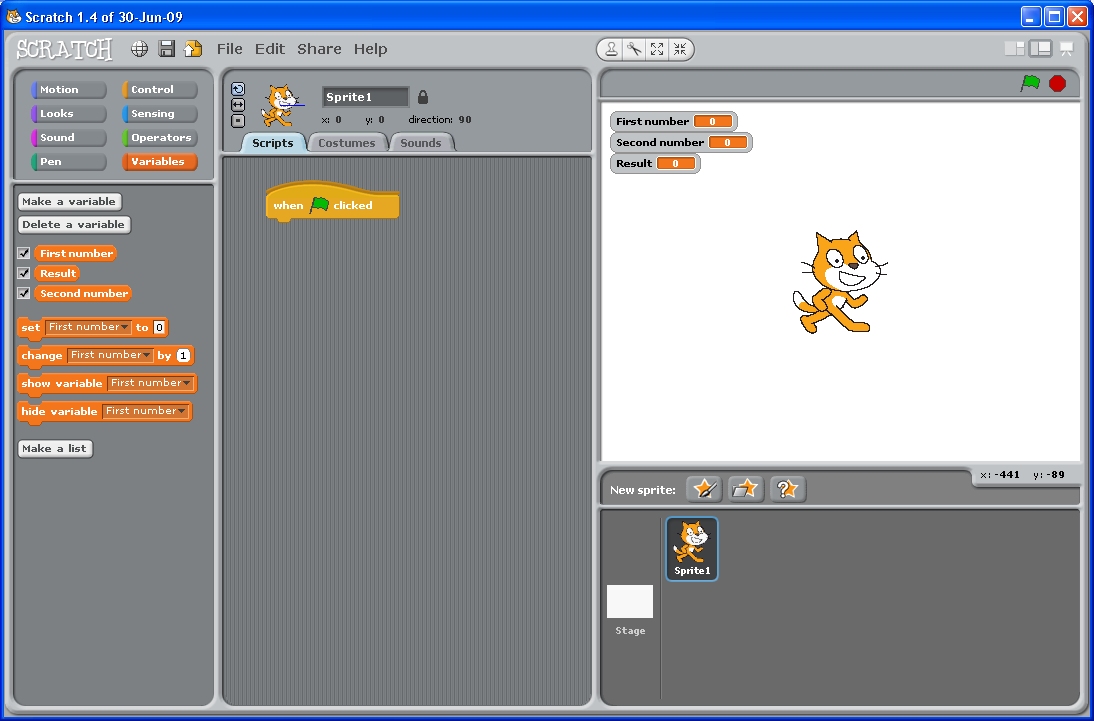
Figure 1 Three variables defined in Scratch.
Notice that on the stage there is a display of each variables value.
The display of a variable is controlled by the tick next to the variable name in the
Variables pallette (Figure 2). Unticking a box takes away its display.
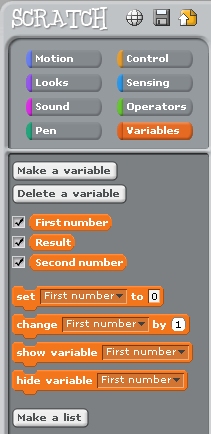
Figure 2 Variables pallette with three variables defined.
You should also notice that there are four action blocks which can operate on a variable.
Each of these blocks includes a varable name (in Figure 2 'First number' is selected as the
default but you can use the pulldown menu to select any variable) to which it will apply:
-
"set <variable> to <value>" allows a variable to be given a value.
-
"change <variable> by <value>" allows the value held in a variable to be altered by some
specified amount.
-
"show variable <variable>" and "hide variable <variable>" display and hide the variable's
value on the stage. This is the same action as ticking or unticking the variable in the
pallette but allows yoou to do the same within a program.
-
Now set some values in the variables. To do this drag two 'set...' block onto the scripting pane
and join them onto the stack. Then set some values, perhaps as in Figure 3 below.

Figure 3 Blocks setting variable values.
-
Next add the two variables together and put the result into the 'Result' variable.
To do this click on the 'Operators' button and drag a "<> + <>" Block onto the
scripting pane (Figure 4).

Figure 4 Addition block operator with blank operands.
Then fill the addition Block operands with your variables so that it performs the addition
(Figure 5). To do this switch to the variables pallette and
drag each variable name from besides its tickbox on the pallette
onto the operator's empty operands.

Figure 5 Addition block operator with variables as operands.
-
Next set the result variable to the value created by the addition operator so that
you have a complete stack as shown in Figure 6.
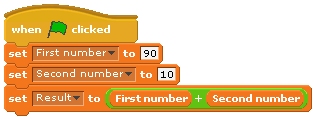
Figure 6 Completed stack for addition of two variables.
-
Now you can run the Stack by clicking on the 'when clicked' block. Observe the values of
the three variables displayed on the stage. The result variable will show that it has
'100' as its value.
Let's quickly make an adjustment to the Stack so that it performs the same function
but uses just two variables rather than three. We can do that by putting the result
of the addition back into one of the original variables - the 'First number' variable
for example. This will save some space as we then use one less variable but it also
demonsrates how the value of a variable, any variable, can be changed.
To do this simply click on the 'set' part of the final statement and change it from
'Result' to either 'First number' or 'Second number'.
You can then click 'Delete a variable' on the variables pallete and select 'Result' or
simply uncheck the tick next to 'Result' so it is not displayed. Then run the
Stack again. The value of 'First number' is first set to 90 and then replaced by the
result of the additon, so it becomes '100' (see Figure 7).
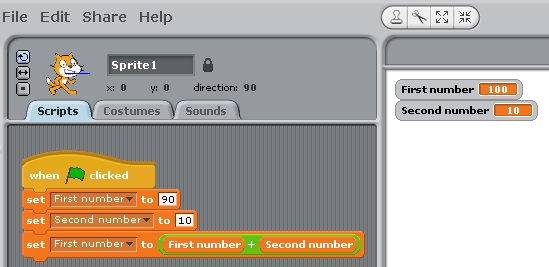
Figure 7 Addition stack after being run using two variables.
So far we have only encountered Scratch variables being used to hold numbers. Of course
there are several different types of data that we might want to handle in a program.
Most programming languages require that you say what kind of data a variable will hold
when you create the variable. This is not required in Scratch.
To demonstrate the use of variables to hold another type of data we can alter the
program to handle some small texts, usually called 'strings' in a programming
context.
The program, which you can
download or build yourself, uses
a couple of Blocks we have not used earlier. The complete program is shown
in Figure 8.
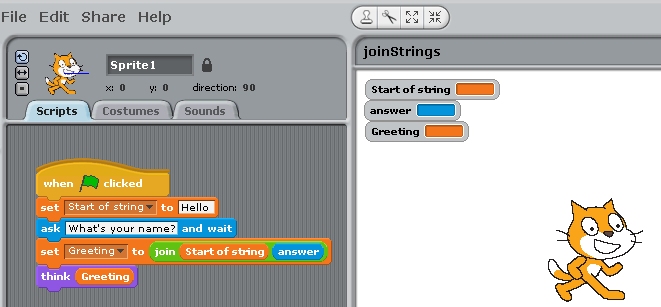
Figure 8 Stack to ask your name and join the response to "Hello ".
You can assemble it in a straightforward fashion but it deserves some
explanation:
-
the first poin to note is that the 'Start of string' variable is set
to a value which includes a final space character. So it is set to "Hello "
and not just "Hello".
-
the blue coloured 'ask <something> and wait' block is from the 'Sensing' pallette.
You need to type in the question as shown. When this block is executed the sprite
will display the question and then put up a dialgue box for you to type an answer.
You answer is given as the value of 'answer' which you can see on the 'Sensing'
pallette and which is just like a variable on the 'Variables' pallette. It has the
same check box and behaves in the same way.
-
the purple coloured 'think <something>' block is from the 'Looks' pallette.
This block makes the Sprite display a 'think bubble' with the text in the block
displayed in the bubble.
Overall this program is much like the earlier addition. It takes two strings,
(one of which is "Hello ", the other is taken from your response to "What's your name?")
and joins them together (rather than adding as performed with numbers) and then
displays the resulting single string in a bubble from the Sprite on the stage.
Run the program and type your name plus return when the Sprite asks your name
into the dialog box (Figure 9).
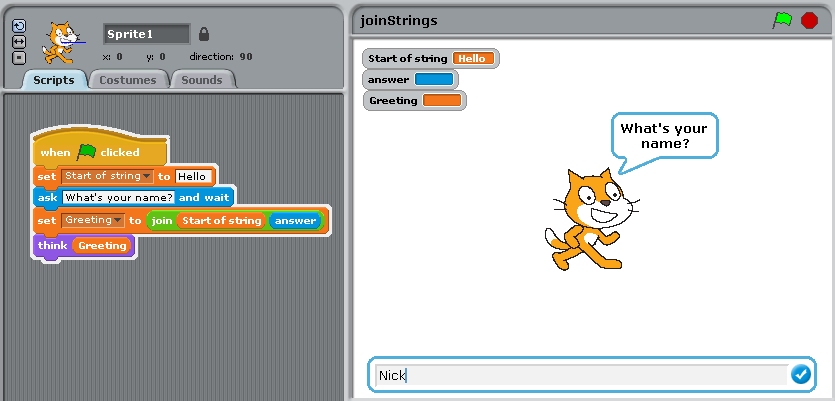
Figure 9 Dialogue box with 'Nick' as the name typed in.
The response is shown in Figure 10.
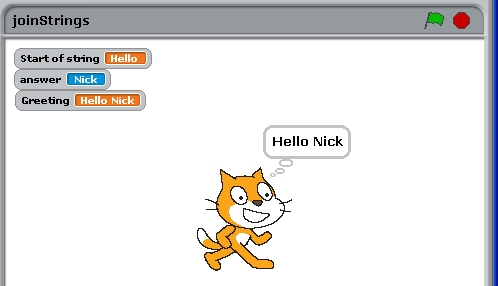
Figure 10 Sprite response with strings joined into one string.
That concludes the adventures using variables. Please go back and
continue onto the next activity.
Back


